Patching plaster walls is a practical solution for dealing with the everyday cracks, dents, and holes that appear in most homes — from picture hooks and door knocks to general wear and tear. With the right tools and a little know-how, many small repairs can be tackled by DIYers confidently.
Table of Contents
Don’t Let a Small Crack Become a Big Problem
Even in the best-kept homes, cracks, dents, and holes in plaster walls are inevitable. Whether from picture hooks, doorknob knocks, or old settlement lines, damaged plaster can spoil the look of an otherwise perfect room.
The good news? Patching plaster walls is a manageable job for many DIYers — if you have the right tools, materials, and guidance.
In this guide, we’ll walk you through how to fix small plaster problems on your own, when to call in the pros, and how to get a seamless finish that blends right in.
What You’ll Learn in This Post
- When DIY repairs are appropriate (and when they’re not)
- Tools and materials you’ll need
- Step-by-step instructions for filling holes, dents, and minor cracks
- How to sand and finish your repair properly
- Common mistakes to avoid
What Type of Damage Can You Fix Yourself?
Before you grab a trowel, it’s important to know what’s DIY-friendly and what needs a professional plasterer.
✅ Suitable for DIY:
- Hairline cracks
- Nail/screw holes
- Shallow dents
- Chips around sockets or switches
- Old drill holes
⚠️ Call in a Pro for:
- Large cracks that move or widen
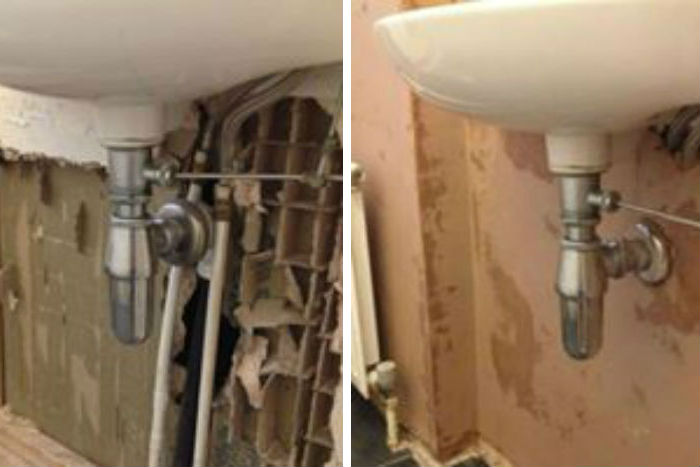
- Sagging or hollow (“blown”) plaster
- Deep cracks showing lath or brick
- Signs of damp or moisture damage
- Whole-wall replastering or skimming
💬 Not sure which it is? Tap the wall — a hollow sound usually means it’s blown.
Tools & Materials You’ll Need
Tool | Purpose |
Filling knife / small trowel | Applying filler |
Scraper or utility blade | Removing loose material |
Sanding block or paper (120–180 grit) | Smooth finish after patching |
PVA or primer | Helps filler bond |
Dust sheet / masking tape | Protects your floors and edges |
Vacuum or brush | To clean dust before patching |
For materials:
- Ready-mixed wall filler (for small jobs)
- Multi-purpose powder filler (for deeper holes)
- Optional: touch-up paint or mist coat
For more detailed information on suitable plastering materials, you can refer to the Thistle MultiFinish product page by British Gypsum
Step-by-Step: How to Patch Plaster Walls

Step 1: Assess the Damage
- Tap around the area to check for hollow sounds
- Remove any loose debris with a scraper or utility knife
Step 2: Prepare the Surface
- Clean dust and loose particles
- If surface is very dry, apply diluted PVA glue or a mist coat to help filler stick
Step 3: Apply the First Layer of Filler
- Use your filling knife to press filler firmly into the hole or crack
- Slightly overfill to allow for shrinkage
- Feather the edges with your knife
Step 4: Let It Dry Fully
- Drying time depends on product and depth
- Most fillers dry in 1–3 hours, but check packaging
Step 5: Sand Smooth
- Use 120–180 grit paper to sand the patch level
- Keep the area slightly larger than the repair to blend edges
Step 6: Inspect and Repeat if Needed
- Apply a second coat of fine filler if the patch isn’t fully flush
- Sand again after drying
Step 7: Prime and Paint
- Use a mist coat (diluted emulsion) or primer on bare filler
- Paint over with your wall colour — and done!
For extra guidance, British Gypsum has a visual step-by-step guide for patching plaster walls at home.
Pro Tips for a Flawless Finish
✅ Use a light source at an angle when sanding — it shows bumps clearly
✅ Wipe away all dust before priming or painting
✅ Don’t skip mist coating — paint won’t stick well to raw filler
✅ Match texture with the rest of the wall (use sponge dabs or light roller strokes if needed)
Common Mistakes to Avoid
Mistake | Result |
Not removing loose plaster | Patch will fall off |
Overfilling deeply | Cracks or slumps as it dries |
Not feathering edges | Visible ridge after painting |
Painting over damp filler | Patch will bubble or flake |
Can You Patch Over Cracked Paint or Wallpaper?
- Cracked paint? ✅ Yes — but sand it back first
- Wallpaper? ❌ No — remove the wallpaper completely before patching
- Flaking paint? ❌ No — scrape and seal with primer before applying filler
When to Call a Plasterer Instead
You’ve got the tools and skills, but some jobs are better left to professionals:
- The damage covers multiple patches or a large area
- The wall feels hollow or crumbles when tapped
- You’re selling and want a perfect finish
- You’re planning to skim or paint with high-sheen paint (imperfections show!)
At P3 plastering, we offer affordable patch plastering services for jobs too big or time-consuming for DIY. We also offer skimming if your wall needs a full refresh.
Real-World Examples of Patching Plaster Walls
Situation | DIY or Pro? |
Small dent from a door | ✅ DIY |
Large corner crack near ceiling | ⚠️ Pro |
Old picture hook holes | ✅ DIY |
Wall blown around a radiator | ⚠️ Pro |
Frequently Asked Questions About Patching Plaster Walls
Can I use polyfilla to patch plaster walls?
Yes — polyfilla or ready-mixed filler is fine for small holes, hairline cracks, and dents. For deeper repairs, a multi-purpose powder filler or bonding plaster may be more effective.
How do I know if the plaster is blown or just cracked?
Tap the area gently. If it sounds hollow or flexes when pressed, it’s likely blown (detached from the wall behind) — and should be replaced by a professional.
How soon can I paint over the patched area?
Wait until the filler is completely dry and has been sanded smooth. Apply a mist coat or primer first to help the paint adhere evenly.
.
Can I patch plaster over wallpaper or flaking paint?
No. You should always remove wallpaper and loose or flaking paint before attempting any wall repair. Filler won’t adhere properly otherwise.
Will the patch be visible after painting?
If you feather the edges well, sand smooth, and use a mist coat before painting, your repair should blend in seamlessly — especially with matt emulsion.
Final Thoughts
Small wall repairs don’t have to mean a big headache. With a bit of prep, the right filler, and a steady hand, patching plaster walls is well within reach for a capable DIYer.
But if you’re dealing with blown plaster, structural cracks, or just want a professional finish, we’re always here to help.
📞 Need Help with a Wall Repair?
Whether it’s a single room or a full house, P3 Plastering brings 40+ years of experience to every repair job — no matter how small.
👉 Request a free quote or call now to speak with a friendly expert.